Goals
What is Goals?
Swit Goals is a paid plug-in feature available in the Advanced plan and above. Goals is an OKR (Objectives and Key Results) based goal management tool that will help your organization work in a more cohesive manner. With Goals, your team can develop goals aligned with the company mission, track their progress, and reflect on the outcome to maintain engagement. Goals is especially effective for managing company-wide goals in an organization because Swit is an all-in-one platform that offers cross-functional collaboration across all workspaces. OKRs can be shared to channels, connected to tasks, viewed by other members to provide context and alignment in collaboration.
What are OKRs?
OKRs, or Objectives and Key Results, are a goal-setting methodology increasingly used in many companies. OKRs can constitute a powerful framework to fulfill your organization's mission, and they concern measurable goals for which progress can be tracked. Having clearly defined goals for specific time periods increases transparency, motivation, and productivity in an organization.
- Objectives: Objectives are qualitative descriptions of what you want to accomplish in a given period. They should be ambitious and engaging goals.
- Key results: Key results are milestones that measure your progress towards the objective. They should be measurable, and each objective can have more than one key result.
Goals manager
Managers of Goals are assigned by the organization's master or admins in the Goals managers tab in the Admin console. Goals managers have access to the Goals settings page where they can manage various settings for Goals throughout the organization, and they can designate the organization OKR editor.
Goals page overview
Swit Goals is consisted of objects and one or more key results. The key results that support the organization's objectives become each team's objective and the key results that support each team's objective become each team member's objective. The OKR structure that aligns the organization to team, and team to individual is shown in the tabs on the Goals page.
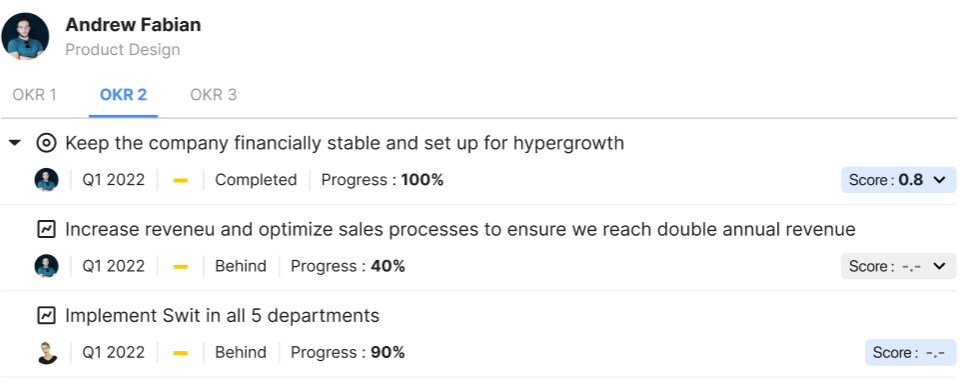
My OKRs tab
In the My OKRs tab, each team member can create and manage their own objects and key results based on what they are in charge of within the organization. You can see all your objects and key results for the "current period" at a glance, and deal with the tasks assigned to you according to your schedule.
TIP
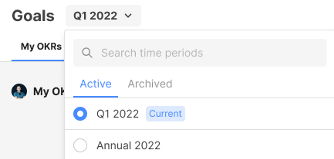
When you enter the My OKRs tab, the OKRs that correspond to the current period are displayed. The current period can be set and edited by Goals managers. You can change the order of your key results to a single objective in the "My OKRs" tab by dragging and dropping.
Create objects and key results
Once the setup period begins, you can compose your OKRs for the current period. You can create new objects and key results as follows:
- Enter the My OKRs tab.
- Click on + New objective.
- Type in the Objective title and press the Enter key to create a new objective.
- Click the +New key result button below the created objective or enter the objective details page to add key results to the objective.
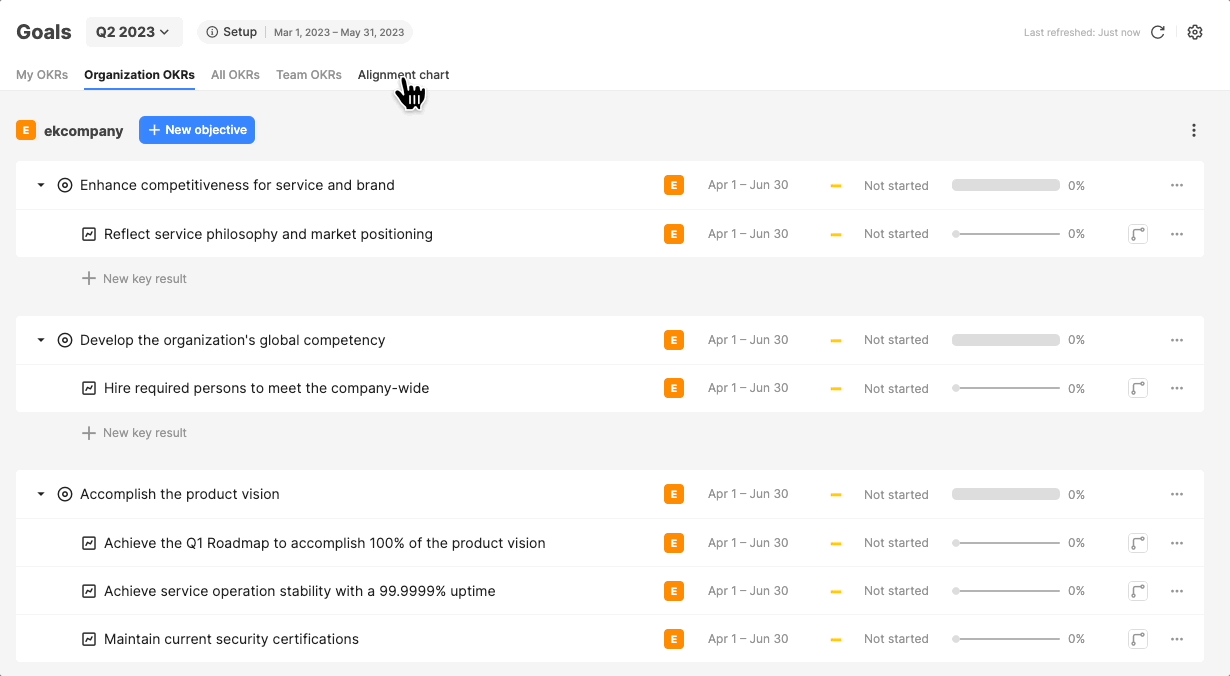
Organization OKRs
In the Organization OKRs tab, organization members can view the organization's objectives and key results set by the organization OKR editor. This is where you can see the organization's OKRs at a glance, so at the top of the page, the organization name is displayed. The organization OKR editor can add key results and assign them to other members in the organization. The organization OKRs can be shared to channels and chat.
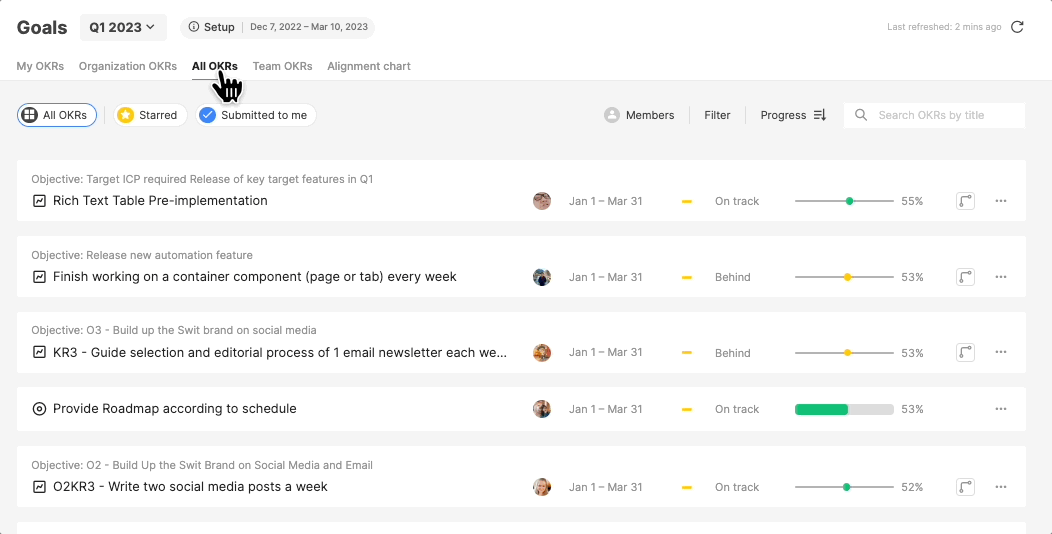
All OKRs
The All OKRs tab shows the OKRs of all members in the organization. When all objectives and key results in the organization are available for everyone to view, it becomes clear what the company's goals are, and who works with what goals to realize them. The activity of all members are shared within this tab, allowing collaborating team members to continuously check their shared goals and their progress. Unlike other tabs, you can filter the list of OKRs by starred items or those submitted to you for review so that the OKRs that need your attention are separately viewable.
Starred OKRs
When you click Starred at the top of the All OKRs page, you can see the list of OKRs you starred. To star an objective or a key result, click on the see more icon ( ) at the right of each item and select Star.
OKRs submitted to me
When someone else in the organization designates you as the reviewer of their OKRs, you can click the Submitted to me button in the All OKRs tab. These will also be sent via chat at the point of submission, but using these filter buttons help you identify and efficiently manage the OKRs that need your review.
Team OKRs
You can also see everyone's OKRs by team. In the Team OKRs tab, all teams in the organization including those unassigned are shown, and by clicking each team, you can see the list of OKRs of all members in the team.
-
Teams column: The percentage next to the team name refers to the average progress value of the team lead's objectives. If there is more than one team lead, the average progress value of all objectives owned by team leads will be shown. If there is no team lead, this will remain blank. When the OKR reviews are complete, the average score of the team lead's objectives will be shown instead.
-
Members column: In this column, you can see the number of objectives and key results, the average progress or score of objectives and key results, progress summary, and reviews of each member.
Search OKRs in All OKRs
In the All OKRs tab, you can use the search feature at the top right of the list of OKRs to search them by various properties.
Search by member
When you click the Members button, a search box appears where you can search members. Enter one or more member names to see their OKRs.
Filter OKR list
The OKR list can be filtered by status, progress, priority, or view. Click Reset to reset all filters applied.
Search OKRs
You can use the search window to see the list of OKRs with the keyword entered.
Objective details page
The objective details page is composed of the following elements. Each element helps you visualize the objective planned depending on the priority, and understand the progress of your targeted goals.
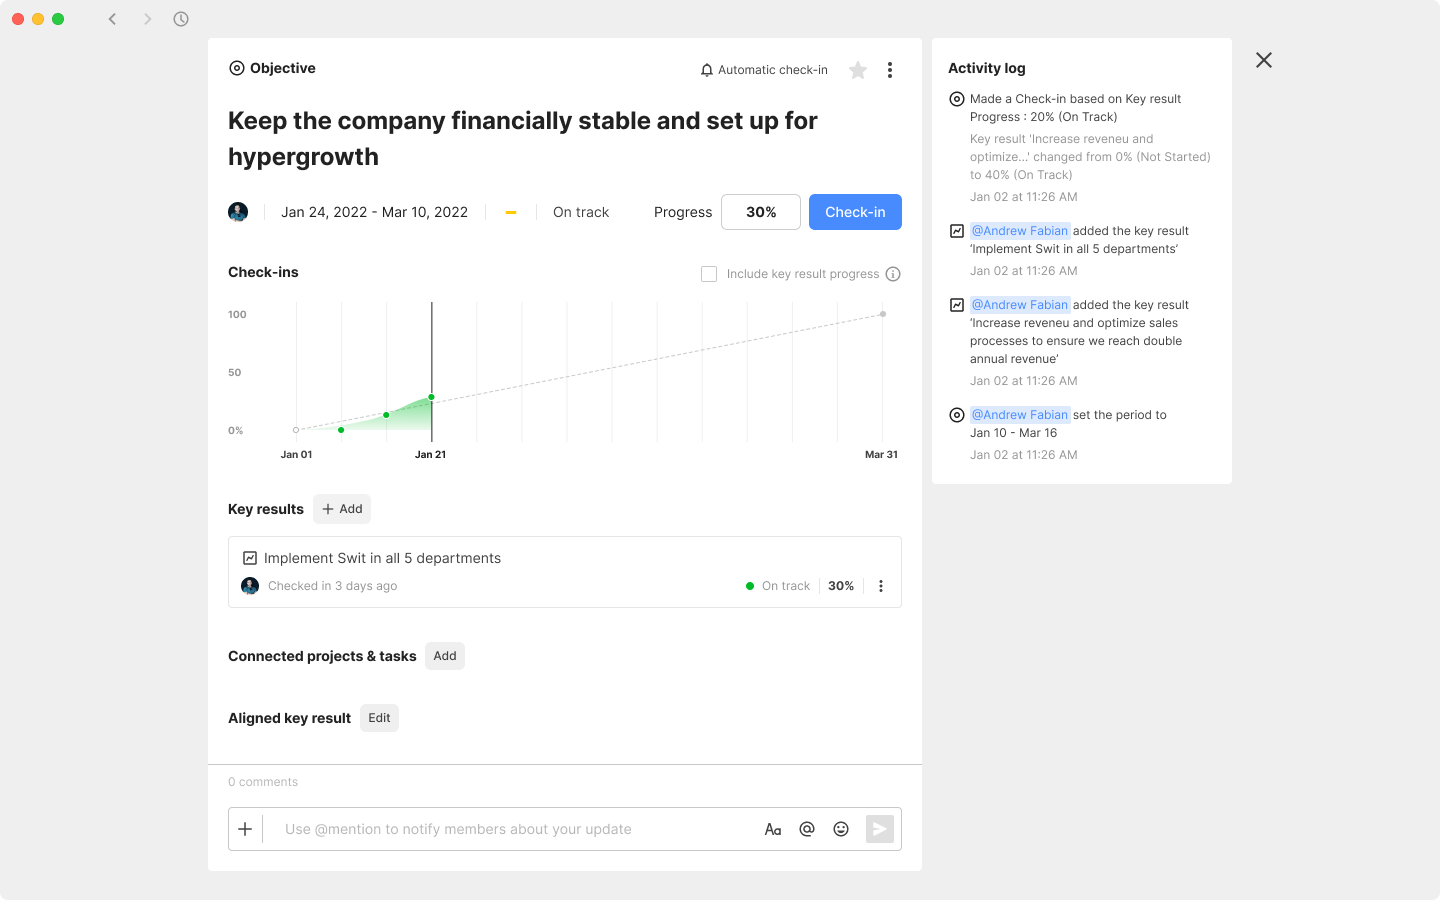
- Auto check-in: This is an option only available on the objective page. Allowing auto check-in will automatically update the progress for the objective based on the average of all key results under the objective without having to check in for the objective with the progress and status.
- Auto check-in notification: When using auto check-in, turning this option on will notify you when an auto check-in is made.
- Star: Clicking on the star icon will star the objective. Starred objectives are shown in the Starred section in the All OKRs tab.
- Check-in: You can check in to enter the current progress and status of an objective frequently. When auto-check in is activated, the expected progress based on the progress of key results are shown.
- Progress and status: You are required to enter the values of progress and status when checking in. These are important indicators of your progress, and when auto check-in is not activated, you can enter specific values for your objectives. When you enter your progress, the status is automatically chosen based on the percentage of work done.
- Include key result progress: Check this box if you want to show the key result progress graphs to your objective progress graph.
- Check-in graph: Your check-in values are reflected in the graph area to visualize your progress throughout the period.
- View and add key results: Click the + Add button next to Key results to add key results and view the added key results to view your check-ins and progress.
- Connected projects & tasks: Here, you can connect projects or tasks related to the objective.
- Aligned key result: If there is a key result that corresponds to the objective, you can align the objective to the key result.
- Comment: In the comment section, you can discuss with other members about the objective.
- Activity log: All activities you perform in the object details page are recorded in the activity log. Up to five items are displayed in the activity log box by default, and you can click See more to see all activities, and click Hide to go back to the default display.
Key result details page
The key result details page is composed of the following elements. The key result page is most useful when it is specific, and you can change the metric for more detailed setting. The owner of the key result should constantly check in to update their progress. The expected progress serves as a guide to reaching the targeted level.
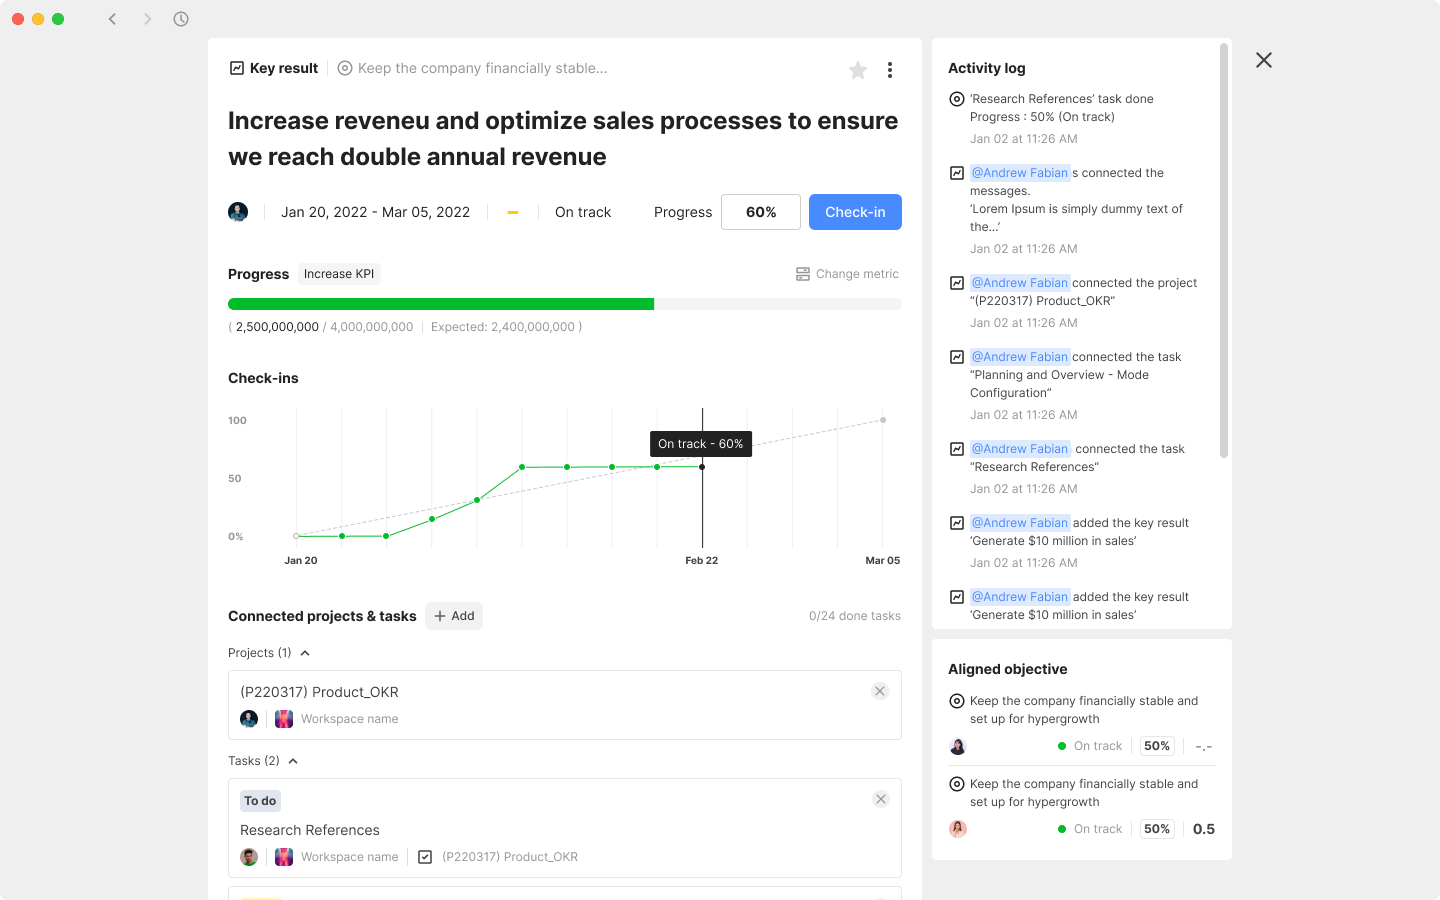
- Check-in: You can check in to enter the current progress and status of an objective frequently. When checking in, you can click Change metric at the bottom of the modal to track the percentage, KPI, or the number of tasks for progress.
- Progress and status: You are required to enter the values of progress and status when checking in. These are important indicators of your progress, and next to the progress, the metric that the graph is based on is shown.
- Check-in graph: Your check-in values are reflected in the graph area to visualize your progress throughout the period.
- View and add key results: Click the + Add button next to Key results to add key results and view the added key results to view your check-ins and progress.
- Connected projects & tasks: Here, you can connect projects or tasks related to the objective.
- Comment: In the comment section, you can discuss with other members about the objective.
- Activity log: All activities you perform in the object details page are recorded in the activity log. Up to five items are displayed in the activity log box by default, and you can click See more to see all activities, and click Hide to go back to the default display.
- Aligned objective: If the key result was aligned to an objective, the aligned objective is shown in the key result details page. You can also align this key result to an existing objective or add a new objective and assign it to a member in your organization to align this key result to.
Mark as invalid
Marking an objective or key result invalid makes it impossible for the OKR owners to check in to the objective or key result or write a review. When an objective is marked invalid, all key results aligned with the objective are made invalid as well.
Goals settings
Goals managers can click on  at the top right of the Goals page to enter the Goals settings page. Here, overall settings related to notifications, time periods, and the organization's OKRs are centrally managed.
Notifications
In the Notifications tab, Goals managers can schedule check-in reminders and announcements for organization members to make sure that they keep up with the OKR cycle.
Check-in reminder schedule
Switching the toggle on will send out activity notifications to the members in the organization reminding them to check in on their OKRs regularly. It can be scheduled weekly, bi-weekly, or monthly, and the day and time can be set as well. Each member will receive a notification according to their time zone. There is an option to adjust the next check-in notification schedule to for more flexibility. When this toggle is off, no notification is sent.
Announcements and templates
Goals managers can also schedule and send chatbot messages to specific channels to deliver announcements. Announcements can contain messages that need the organization members' attention such as announcing of an OKR time period, sharing of the organization OKR, etc.
- Announcements: This tab shows scheduled announcements in the organization. You can make an announcement directly or use one of the templates already created.
- Templates: Announcement messages that recur can be managed with templates.
Time periods
This is where time periods for the organization's goal-setting process are managed. Goals managers can add, edit, set as current, and archive time periods that concern the OKR cycles.
Add a new time period
To add a new time period, click New time period.
- Execution: This is when the members actually execute the objectives and key results laid out during the setup period and track their progress. Check-ins are available during this period.
- Setup: Members can create, edit, or delete their OKRs only during this period, and when the setup period ends, the set OKRs cannot be changed or deleted. The setup period must end before the review period starts.
- Review: When the review period begins, everyone who owns an OKR can enter scores and reviews to reflect on their progress at the end of the cycle. The period goes on until it is archived.
Edit a time period
Time periods can be edited after they are created. Click on  at the right end of the period you want to edit, then click Edit time period.
| Start date | End date | |
|---|---|---|
| Setup | Cannot be changed once the period begins. | To extend, the review period must be postponed because set up and review can't overlap. |
| Execution | Cannot be changed once the period begins. | Can be extended to a later date, but cannot be shortened to an earlier date. |
| Review | Cannot be changed once the period begins. | Can be extended or shortened. |
TIP
The title can be edited only during the setup period, and the time zone cannot be changed once the time period begins.
Set as the current time period
The current time period can be selected from the list of time periods. The current time period set is displayed by default for the organization members upon entering the Goals tab. Click on at the right end of the period you want to make the current time period, then click Set as current time period. At least one period has to be set as the current period, and the period set as current cannot be deleted.
Archive a time period
Goals managers can archive time periods to preserve the data contained in past cycles of Goals. Click on  at the right end of the period you want to archive, then click Archive time period. Archiving is available any time, even when the time period has not passed. Archiving a time period will pause the whole goal management process, and no notification will be sent regarding this time period. Archived periods cannot be deleted or unarchived to prevent data conflicts.
Delete a period
Goals managers can also delete time periods, but only if no OKRs were created for the time period. Click on at the right end of the period you want to delete, then click Delete time period.
Organization OKR editor
Goals managers can designate one person to be the organization OKR editor who will set the organization's OKRs and execute them. The first person to be assigned the role of Goals manager becomes the organization OKR editor by default, but it can be changed.
What is a check-in?
A check-in is a way of tracking the progress of your OKRs for a given period. During the execution period, owners of OKRs can check in regularly using the metric of their preference. This is an important process in the OKR cycle because OKR owners can make sure that they are going in the right direction and that their teams stay on track and focused.
Checking in for objectives
- Auto check-in: Owners of OKRs can either check in directly on their objectives or check in on their key results so that the check-in data for key results are automatically rolled up to the progress for objectives. When automatic check-in is allowed, the owner of the objective will not be able to edit the percentage or status of the objective manually. When this option is allowed, the roll-up notification option is activated. You can decide to receive notifications whenever changes made in the key results roll up to affect your objective.
- Progress: When the auto check-in option is off, you can enter your progress in percentage.
- Current status: When you enter your progress, the status is automatically chosen. Unless the auto check-in option is on, you can still change the status.
- Note: You can add a note if you want to comment on your progress.
NOTE
Disallowing automatic check-in after allowing it first will not automatically roll up the data from key results.
Checking in for key results
Owners of OKRs can enter the progress, status, and note for each key result as well. Note that for a key result, the progress can track the percentage, KPI (Key Performance Indicator), or the number of tasks. The number of tasks is applied automatically and the other values can be entered manually. The metric can be changed in the check in modal.
Check-in reminders
Goals managers can set check-in reminder schedules to encourage organization members to check in and track their progress regularly.
Check-in graph
The check-in graph for an objective with the key result progress included is as follows. The x-axis of a check-in graph shows dates by week and the y-axis shows progress.
- Graphs: Each single line graph represents each key result and the area chart shows the progress of the objective that consists of the key results. The gray dotted line graph represents expected progress for a given objective throughout the time period. If the actual graphs fall below this line, you can be aware that you are behind the schedule.
- Progress and status summary: The latest check-in date is recorded in the graph. When you hover over the graph, you'll be able to see the progress and status of OKRs for each check-in date.
- Include key result progress: You can turn this option off to see only the graph of the objective.
Check-in activity
When the owners of OKRs check in, their activities are recorded for better tracking of progress.
Review
At the end of an OKR cycle, there is a review period to reflect on the achieved results and get feedback. This is a period to look back on your progress, see what you accomplished and what challenges you faced, and find room for improvement in the next OKR cycle to stay productive and aligned with the organization's goals. You can also discuss with another reviewer to get an idea for possible adjustments in your OKRs.
Review permissions
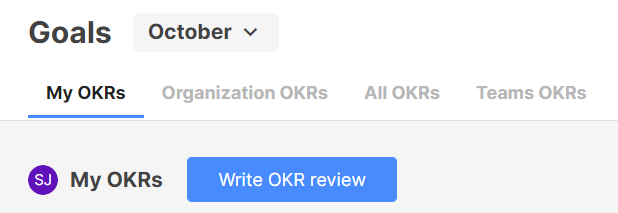
Once the review period begins, owners of OKRs will see the Write OKR review button in the My OKRs tab.
- When you are the owner of the objective: You can enter a score and add a comment. You can also view all key results of your objective. If you're not the owner of the key result, you have no access to edit the score.
- When someone is the owner of the objective, and you are the owner of a key result: You have no choice of changing the score, but you can still add a comment.
Write a review
You can write a review as follows:
- When the review button appears at the end of the OKR cycle, press the button.
- Set the score and write a reflection. If an item requires your scoring, it will be displayed blue. If a score is not entered, it will be displayed as -.-.
- Save the review and submit it for confirmation. You have to give a score and write a reflection for each item to submit the review.
TIP
The scores and reflections can be edited any time during the review period. They can even be edited after the reviewer is selected and the reviewer confirms the review for release. When they are changed after the reviewer is chosen, they will be notified of the changes.
Assign and change a reviewer
When submitting the review, you have to choose a reviewer who will confirm the review. Having another reviewer is useful in an organization because it can keep individuals' goals aligned with the team and the company. Only one person can be the reviewer and it cannot be yourself. You can change the reviewer of your OKRs even after comments have been written, but the reviewer cannot be changed when your review is confirmed for release. When there is a change of reviewer, the comments of the previous reviewer will be deleted.
TIP
A separate reviewer is not required for an organization OKR editor's OKRs. The organization OKR editor can add a reviewer, not add a reviewer, or delete a reviewer after assigning a reviewer.
Submit and share a review with reviewer
Once the reviewer is selected, a chat message is sent to the reviewer with the number of items per status and the average progress. The reviewer has to leave a feedback and confirm the review by the stated due date. The OKR owner can still change the score or the reflection after submitting, but it will not be released if not confirmed by the reviewer. Editing a submitted review will notify the reviewer.
Reviewer
The reviewer can see the OKRs they need to confirm in the chat or click the Comment button in the All OKRs tab. The reviewer has permission to add a comment only, and has to add comments to all OKRs in order to confirm them and release them publicly. Once the reviewer adds all comments, the Confirm button is activated and when the reviewer confirms, the scores and reviews become accessible to everyone in the organization. Even after the review is released, the OKR owner can still ask the reviewer to recall the confirmation and both the owner and reviewer can edit it if the review period has not ended yet.
Set an alignment
The OKR owner can set an alignment between objectives and key results. By aligning objectives with key results, it is convenient to understand the aligned OKR structure.
Align an objective to a higher level key result
You can align your objective to a higher level key result as follows:
- In the objective details page, click on the Set button at the bottom.
- Select a member or organization.
- Select the key result to align your objective to.
Align or create an objective from a higher level key result
You can align or create an objective from a higher level key result as follows:
- In the key result details page, click on the Set button at the bottom right.
- Select an existing objective to align or create a new objective. When you decide to create an objective, you can assign the objective to multiple members and enter an objective title.
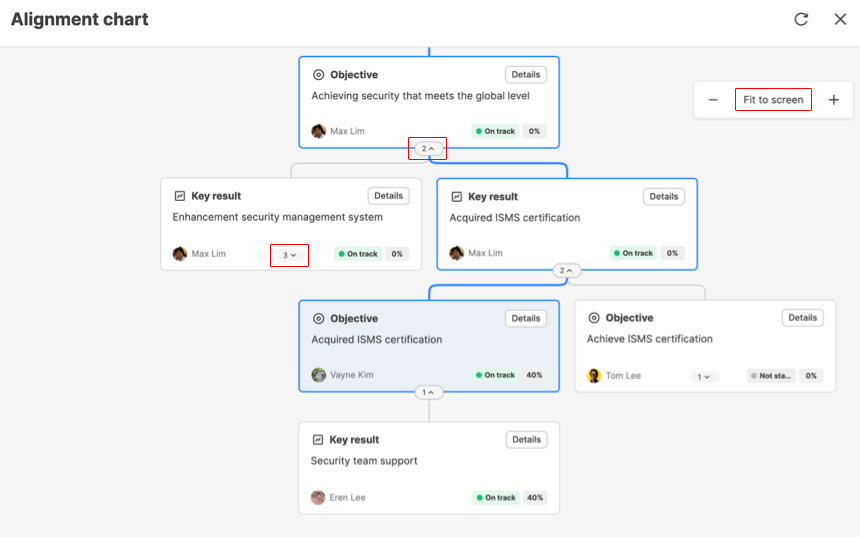
Alignment chart
The alignment chart feature visualizes the alignment between objects and key results at a glance:
- In the Alignment chart tab, the organization’s OKRs are displayed in a tree structure.
- You can view alignment charts in other tabs by clicking on the Alignments icon at the bottom of each item and clicking on “View in chart”.
- The alignment chart is displayed in a tree structure that can be expanded when there are aligned items. The chart can be zoomed in and out, and when clicking on “Fit to screen”, the expanded chart is adjusted to fit the screen.
Utilize Goals in collaboration
In addition to helping organization members manage and achieve their goals with the OKR framework, the Goals plug-in can be utilized in the collaboration process to provide better context and create a shared understanding among colleagues.
Comment on an O or KR
Anyone in the organization can comment on an objective or key result page, and they can mention organization members in the comment. Using comments, you can comment on the OKRs, ask someone to create a relevant key result, etc.
Share OKRs to workspaces
You can also share OKRs to channels or projects in workspaces. You can discuss with your teammates or supervisors to get useful insights from them.
Share to a channel or chat
You can share objects, key results, members, or the organization OKRs to a channel or a chat. If there are guests in the channel where the OKRs are shared, they will see the shared card, but have no access to the details page.
- Sharing an objective or a key result: To share an objective or a key result to a channel or a chat, click on
 at the end of the item you want to share, then select Share to channel or Share to chat.
The shared cards will contain the time period, status, and progress. Clicking will take the user to the object or key result details page.
- Sharing a member's OKRs: Click on at the top right of the My OKRs tab, then select Share to channel or Share to Chat.
The shared card will contain the status and progress of the member's OKRs. Clicking will take the user to the All OKRs tab filtered by the member.
- Sharing an organization's OKRs: Clicking will take the user to the organization OKR tab. Click on , then select Share to channel or Share to Chat. Clicking the shared message to move to the OKRs tab.
Connect with projects and tasks
- Connect a project with OKRs: At the top right of the project page, you will see the connected OKRs to the project. You can connect or disconnect OKRs. Guests will not see this button in the project page.
NOTE
OKRs from archived periods cannot be connected.
- Connect a task with OKRs: In the task details page, you can connect or disconnect OKRs. Guests will not see the Connected OKRs section in the task details page.