Projects
What is a project?
All members of an organization conduct and manage various tasks depending on their roles and collaborate with each other to achieve the organization’s goals. In Swit, you can create projects suitable for each topic and objective, invite relevant members, share, assign, and manage specific tasks, keep track of the overall progress by viewing them in various modes and adjust due dates. Through a close pairing with the channel function for communication within the Swit platform, you can establish a proper workflow and maximize collaboration efficiency and work productivity.
Public vs. private projects
When creating a project or later in the project settings, you can make the project public or private. Public and private projects have the following features.
- Public projects: All members can join by browsing projects.
- Private projects: Can only be joined by invitation from those already in the project. The
 icon is displayed next to the project’s name in the project list, and when non-members browse projects, private projects are not shown.
NOTE
Once projects are set to private, you cannot make them public again.
Project list, starred projects, folders
The left panel displays all projects you joined. You can use some useful features to conveniently categorize, arrange, and access projects.
- Unread projects: If you have unread project notifications, they will be piled under Unread at the top of the project list.
- Starred projects: You can star frequently visited or important projects. Click on
 icon at the left of the project name to start or unstar it. Starred projects are added under the Starred label on the top while maintaining the current order.
- Project folders: Use folders to group starred projects according to their characteristics or task topics.
- To make a folder, click on the
 icon next to the Starred label, and click Create folder.
 - Click on
 next to the folder to rename or delete the folder.
- To make a folder, click on the
- Project folders: Use folders to group starred projects according to their characteristics or task topics.
- Other projects: All projects a user is participating in, excluding those starred, are displayed at the bottom of the project list. At this time, the entire project list is sorted alphabetically.
Various view modes
Swit offers Kanban, List, Timeline, Calendar, and Dashboard views as well as options to view tasks by Status, Bucket, and Assignee. Additionally, in view mode, there's a tab feature that allows you to add and manage websites related to the project. This variety of views helps users categorize and understand their tasks in the most suitable way.
TIP
For tasks that don't have a specific schedule yet, you can first write them in the Backlog and store them. Later, you can drag and drop them to any other section whenever you want.
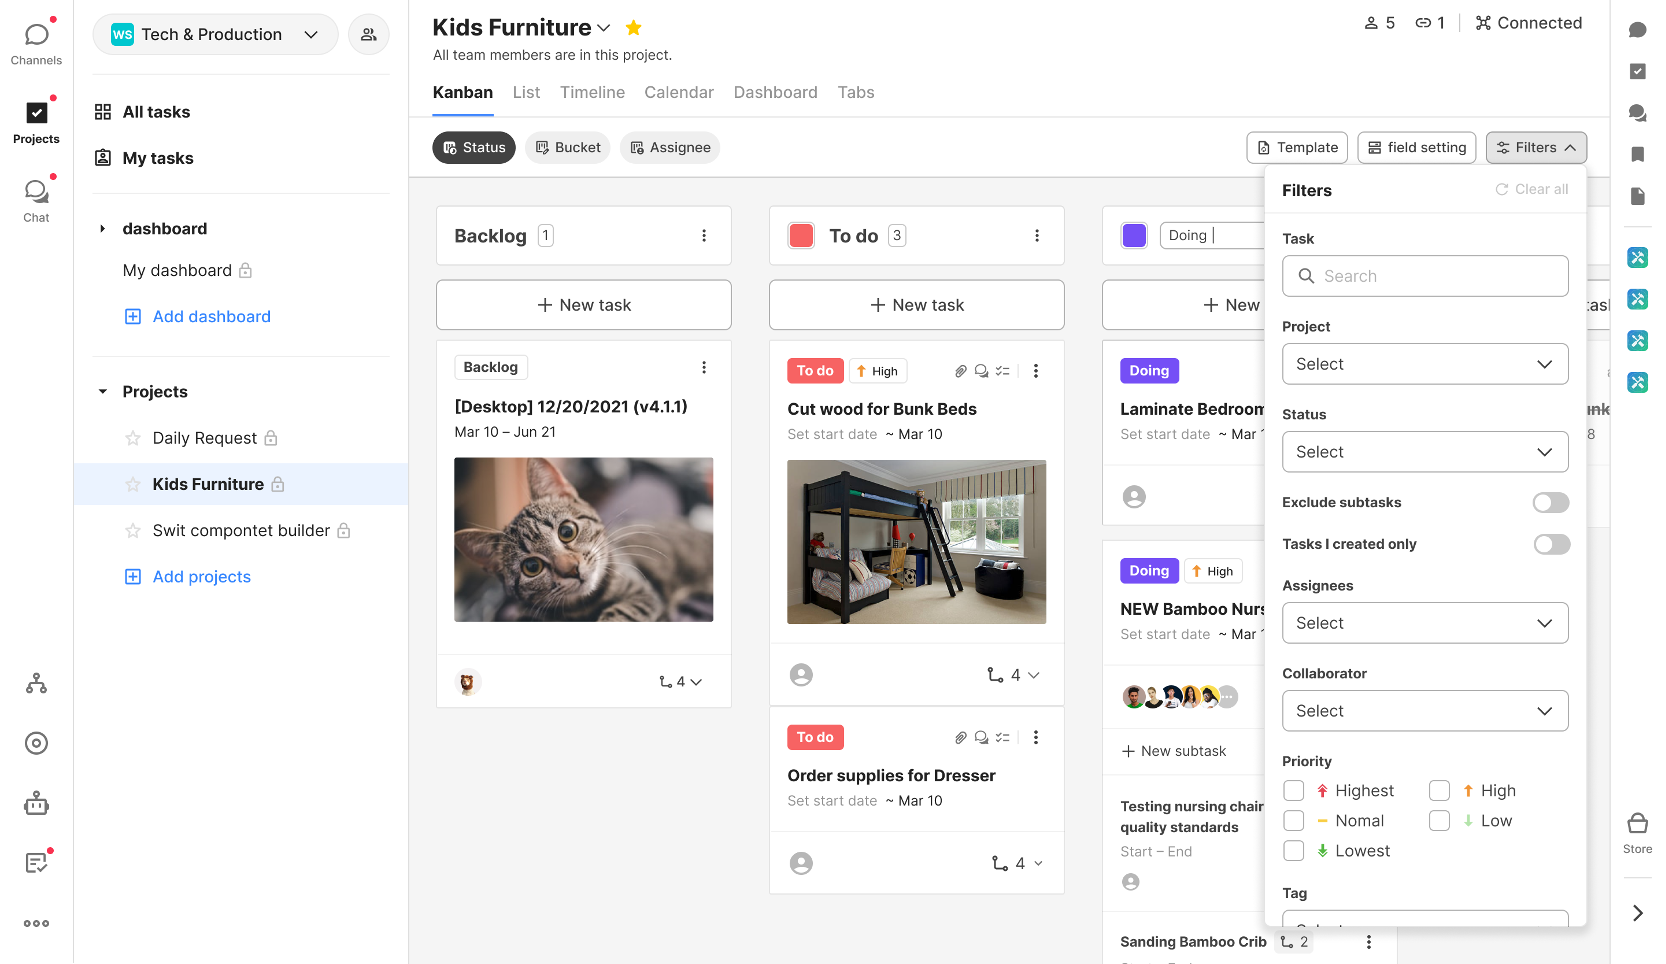
Kanban view
This view Enables you to visualize task management conveniently. The OG data for attachments and links are displayed as images that look like sticky notes.
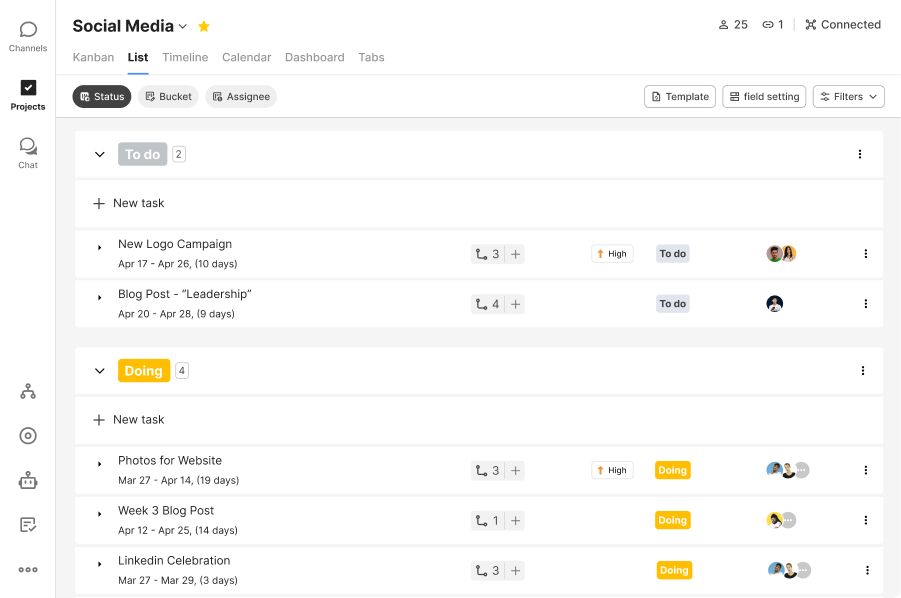
List view
Shows the list of tasks simplified based on task titles. Since the list view only displays the most relevant information for each task, it is useful when you need to can be used when you need to quickly figure out the overall situation of the tasks with task titles.
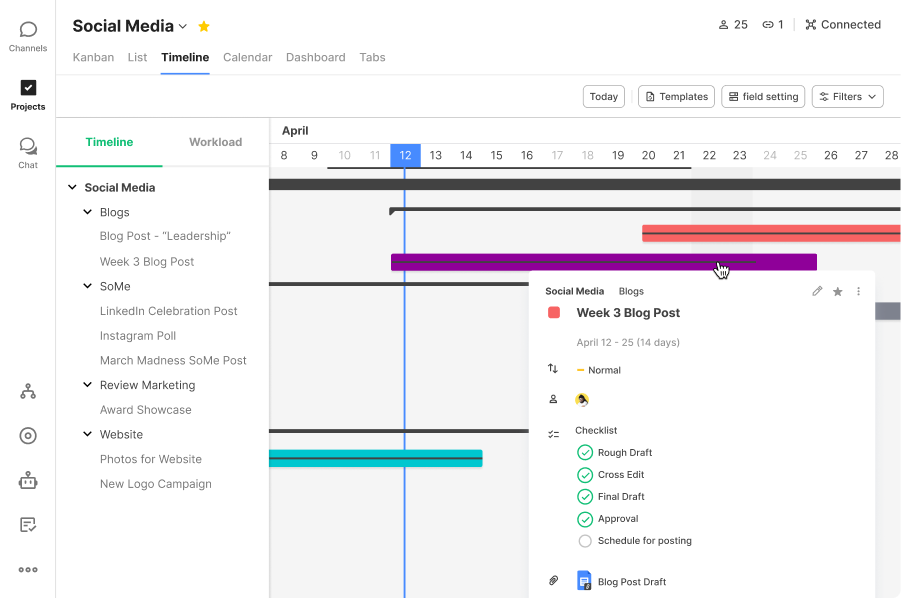
Timeline view
The Timeline view provides a Gantt chart with daily, weekly, monthly, quarterly, and yearly views and facilitates members to get a grasp of the tasks’ progress according to the time period. Dragging and dropping the tasks will change their schedules easily, and you can click each task to see the preview of the task details. At the top left of the view screen, you will find the following tabs that allow two different ways of categorizing the tasks in the Timeline view.
- Timeline: Categorize tasks by bucket
- Workload: Categorize tasks by assignee
Also, when you select the daily basis in the view scale, the Export button appears on the right. When exporting the daily timeline, the data is saved in a .xlsx file format.
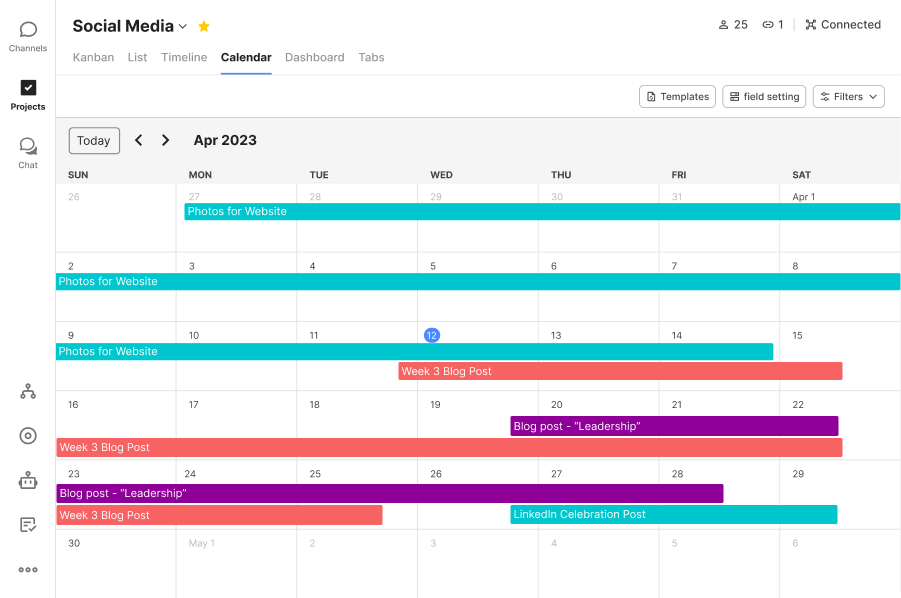
Calendar view
In the Calendar view, you can sort out priorities or adjust schedules for tasks whose deadlines overlap with each other. In the month view of your schedule, you can see the overall progress of the tasks at a glance. Each task is displayed in a horizontal bar graph, and you can adjust the length of the bar to edit the time period of the tasks.
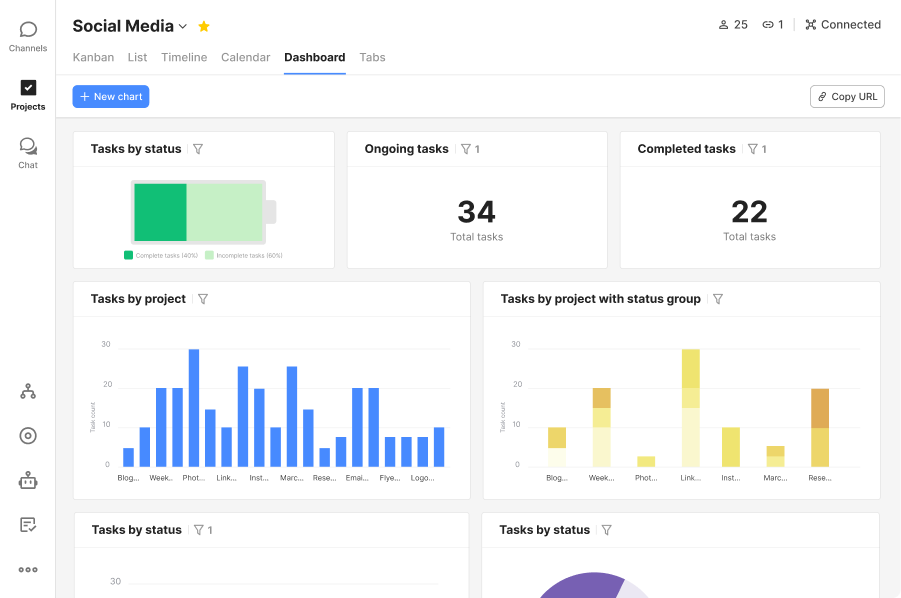
Dashboard view
The Dashboard view visualizes the task data within the project into various types of charts. Using the Dashboard view, you can easily understand the progress, status, and assignment of tasks.
Project tab
For each project, you can add important web pages that contain information worth referencing related to the task as tabs. For more details about tabs, see here.
Join a project
To join a project:
-
Join by browsing projects: Find out the list of projects you can join by browsing projects. Note that this shows only public projects. To join a private project, you must be invited by a member of that project.
-
Join via invitation: When you receive an invitation from a member who is already in a project, you are automatically added to the project.
-
Auto-join: For auto-join projects, you will be automatically added to them upon joining the workspace.
Create a project
When you need a new project to discuss a new topic, you can create one as follows:
- Click on , then select Create project in the menu popping up to open the dialog box for creating a project.
- Set the project’s name, purpose, whether to make it public or private, and the members to invite to the project, then click Create.
Browse projects
Click on the icon next to the project label, and select Browse projects to find all accessible projects.
- Projects you can join: All public projects you’re not a member of are listed. You can select a project you want to join.
- Projects you belong to: All public and private projects you’re in are listed.
- Archived projects: All archived projects accessible to you are listed.
Pairing between projects and channels
Channel pairing enables you to be informed in channels in real time about major activities happening in the projects. Click on  at the top right of the project page to open the paired channel in the right panel. To pair a channel to the project, you have to hold the privileges of the host or higher, and you can pair a channel in the right panel or in Manage project.
Manage a project
Each project is managed by an administrative member called host. The creator of the project is assigned the host by default, but can transfer the role to another member later. Moreover, the master and admins of the workspace have the privilege to manage all projects they joined.
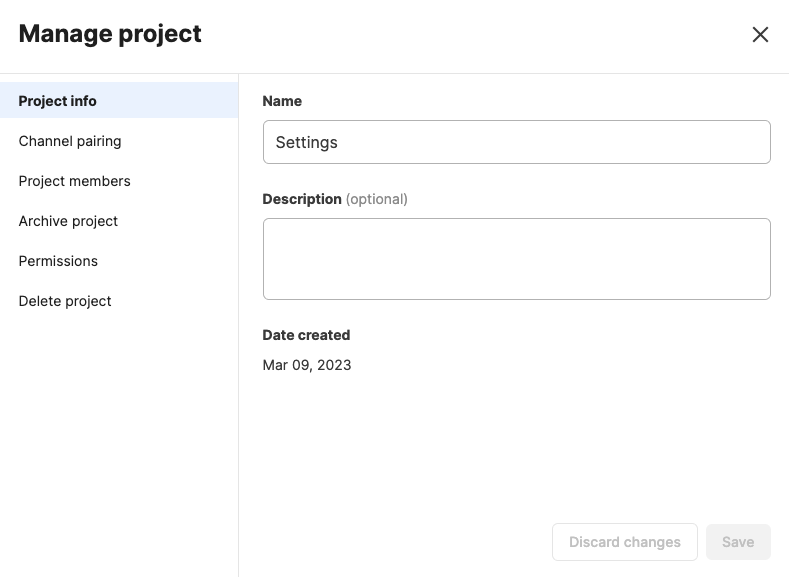
Click the name of the project to open the dropdown menu, then click Manage project.
-
Project info: You can change the project's name and purpose at any time.
-
Channel pairing: You can pair a channel with the project. The linked channel can be opened from the project's right panel, and any real-time work changes within the project are simultaneously notified to the paired channel.
-
Project members: A list of the project's host and members is displayed, and from here, host rights can be transferred to other members.
-
Convert to private project: You can change a public project to a private one. When doing so, the original content and participating members are retained. However, once converted to a private project, it cannot be reverted back to a public one.
-
Archive a project: You can archive a project or reactivate an archived project.
-
Permissions: You can set the permissions for who can add or delete task fields.The default setting is set to host, but the permission can also be given to All members.
-
Delete a project: Once you delete a project, all tasks and subtasks in the project are permanently deleted. You can’t restore deleted projects. However, attachments aren’t deleted.
Add and manage apps in projects
When you install apps from the Swit store to each project, the app is then allowed to read and write project data within the permitted range of scopes. Add apps to receive notifications from external services or to utilize them for task management. The apps installed in the project can be checked viewed under Connected at the top right of the project area.
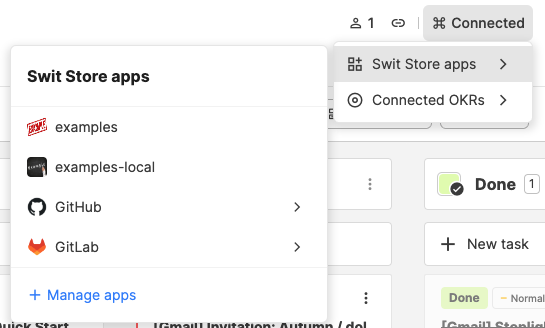
- Click + Manage apps, to view the list of apps installed in the organization, and you can Invite or Remove apps at any time.
- A system message is generated every time you invite or remove a store app.
- When you click on an app installed or invited in a project, a menu appears where you can view the app information or manage the app.
- For some Store apps, you can directly sign in to the account and perform app actions through the Connected.
View shared files
To see all files shared in a project, click on the project name, then click Shared files. Files will open at the right panel. You can easily locate the file you're looking for by searching its name or using filters such as location, member, type, and more.
Set the project status
Customize the status of each project depending on the workflow. You can add a status, and change its name, color, and location any time. For instance, you can modify the status options to match various scenarios, such as the Approved-Under Review-Beta Testing-Release stages.
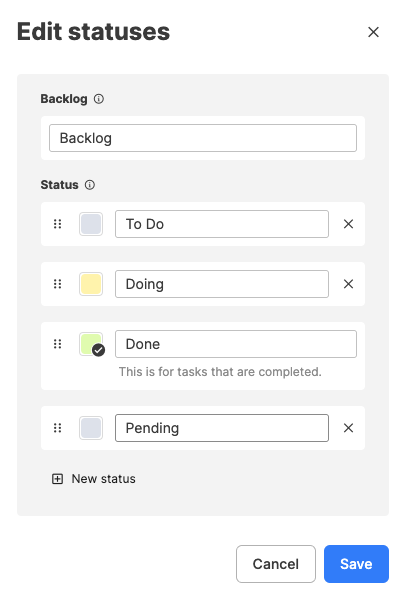
By clicking on the project name from the main screen, a dropdown menu appears. When you click on Edit statuses from this menu, you can edit both the default task status and custom statuses.
NOTE
Custom settings, such as changing or adding a project status, are not supported in the Free plan.
Project push notifications
You can customize push notifications for each project. Click on the project you're participating in. Click on the project name, click Push notifications, then select All new posts, Mentions & keywords, or Mute this project.
Duplicate a project
To duplicate a project,
- Click the project name at the top of the project main page.
- Click Duplicate project.
- Enter a project title and select whether to include the tasks in the project. Then, select what items to keep in the duplicated project and complete duplication.
Project members
You can view the list of members in a project, add new members, or remove members. See below for different actions you can perform based on permissions.
View project members
Click on  at the top of the project screen to see the project members.
Add project members
All participating members can add members to the project. Click Invite to project at the bottom of the list and select members you want to invite from the displayed workspace member list. You can also search for teams or groups to invite in bulk.
Remove project members
Workspace admins or project hosts can remove project members. Click on the  icon to remove a member.
Leave a project
Click on the project name, then click  Leave project to exit the project right away. If you wish to rejoin after leaving a project, you can do so for public projects by browsing projects.
Delete a project
Only the project host can delete a project. Deleting a project will permanently remove all messages, ideas, and tabs in that project. However, attached files will not be deleted.