Tasks
What is a task?
Each project contains individual tasks that can be easily checked and managed using various views and filters. They can also be attached to other channels or tasks to share with other members. You can type in task details so that everyone can be on the same page when collaborating.
All tasks
Click on the All tasks tab located on the top of the project page to see the list of all the public projects of the workspace in chronological order. As you can see the progress of all tasks in the workspace at a glance, this allows you to run your organization in a more transparent way. It also enables the master and admins to check and coordinate the tasks more conveniently, thus minimizing the time and effort spent in sharing and reporting tasks to other members.
Save all task filters
If you have filtering options that you use repeatedly in your workflow, try to save filters. For example, you can use the filters to view My tasks and the task due dates.
- Click
 Filters at the top right of the project screen, and specify one or more filter items such as project, task status, assignee, collaborator, and priority according to your needs. You can exclude subtasks or see only the tasks you're assigned to.
 - Click Save filters.
- Name the filter options, and click Save.
Edit the saved filter options
You can edit the saved filter and save it as a different name or update it as follows.
- Click the arrow next to the
 icon in the All tasks menu.
 - Click on the Filters button, and click the filters you want to edit.
- After making edits, click Update. If you click
 Clear all at the top right of the filter modal, all filters will be cleared.
My tasks
In the My tasks tab, you can view all tasks across projects that you are assigned or designated as a collaborator. In addition to public and private projects for collaboration, you can also create and manage personal tasks. Tasks created in My tasks are considered unique tasks within My Tasks and don't belong to any project.
Custom order in My tasks
In My tasks, you can use the Custom order feature. Click on Custom order at the top right of the My tasks screen to list all tasks you are assigned to or collaborating on, based on Project, Tag, Priority, Color Label, My Role, and Task Status.
Personal tasks
You can create and manage tasks for personal needs not related to collaboration in public or private projects as personal tasks. When you create a new task in the My tasks screen, it will be added as a personal task.
- Personal tasks are not exposed to other members of the workspace.
- Only the individual tasks of the logged-in user are displayed in All tasks.
- While it's possible to move a personal task to another project you're participating in, you can't move a task from another project to personal tasks.
- Only personal tasks can be added as related tasks to other personal tasks.
Create a task
Create a new task to achieve results aligned with the project's goals. By clicking the + New Task button and writing a task title, you can easily create a task. Arrange tasks using drag-and-drop and choose a project view that fits your purpose.
Task overview
On Swit's task page, you can organize the content of various projects regardless of their scale, and many can collaborate transparently. Set deadlines including dates and specific times, assign multiple assignees and collaborators, set task priorities and checklists. You can also attach data related to the task and add subtasks of up to 7 levels. Learn more about each setting below.
Manage checklist items
Break down complex tasks into smaller task units and assign them to individual members. These task units become individual checklist items. For each item, you can set a deadline, change the order, and set an assignee. Visual indicators of the workflow make it easy to understand tasks. Checklists can be converted into separate tasks and automatically linked as related tasks, maintaining the context.
- Add a checklist item: You can add items that need to be checked in the task. Click on
 or Add item to add a new item to the checklist.
 - Set the due date for an item: Click on
 at the right of each item in the checklist to set a due date. This allows you to make sure that sequential tasks of a workflow are completed in order.
 - Assign a checklist item to a member: Click on
 at the right of each item to set an assignee.
 - Cross off a checklist item: When a checklist item is completed, click on the checkbox item at the left to mark the item as completed.
- Hide completed items: To avoid confusion, you can hide completed items by clicking
 Hide completed items next to the checklist. This option become available when one or more of the checklist items is completed.
Add related tasks
By adding related tasks, you can easily refer to it as a part of a larger project. Related tasks are displayed with deadlines, task status, and the assignees. With just a single click, you can easily navigate to related tasks and easily manage large-scale projects.
See the activity log
When there are new activities in the task or changes in the status, they are written in the activity log. The history of activities is useful when you want to look at the changes in the task as time passes.
Default task status and custom status
You can see a list of basic task statuses, including the Backlog, and custom statuses. You can easily add new statuses adequate for the project and change the location of the statuses by drag-and-drop. You can edit the statuses in your project as follows:
-
Click on the project name to open the dropdown menu, and select Edit statuses.
-
You can change the name of the Backlog and status, change the status color and location, and add a new status.
NOTE
Because Done is a default status for completed tasks, it cannot be edited.
Set the priority of a task
The priority options for each task, in the order of importance, are: Lowest, Low, Normal, High, and Highest. The default value is Normal when you create a task.
Task details
On the task overview page, each item in the Details section can be set as follows:
- Bucket: You can select a bucket that exists in the project from the Details section.
- Duration: Adhering to the deadline is crucial for leading a project to success. In Swit, you can set not only the due date but also the due time. Additionally, you can set separate due dates for each checklist to make the process smoother.
- Assignees & collaborators: When there are multiple members overseeing the task, you can specify multiple assignees. Anyone related to the task can be assigned as collaborators. Everyone participating in the task can add, change, or delete assignees and collaborators. Initially, when creating a task, the person who created it is designated as a collaborator by default, and the assignee is left unspecified.
- Color label: You can use color labels of 11 colors depending on the topic and category of a task. A task with color labels are shown as colored bars in the timeline or calendar views.
- Tag: When creating a task for the first time, the tag is defined as None. Click on the tag area, enter the keyword to use as the tag, and click + Create a new tag. You can also search keywords to use as tags from the existing list. You can use multiple tags for a task.
Task attachments
Some tasks require additional context to proceed. For more efficient collaboration, you can upload files directly from a shared drive or computer or attach related chat messages, emails, calendar meeting links, etc. Also, you can attach Swit Approval documents or link OKRs to show how the task aligns to your or the company's goals. You can add attachments to the task as follows:
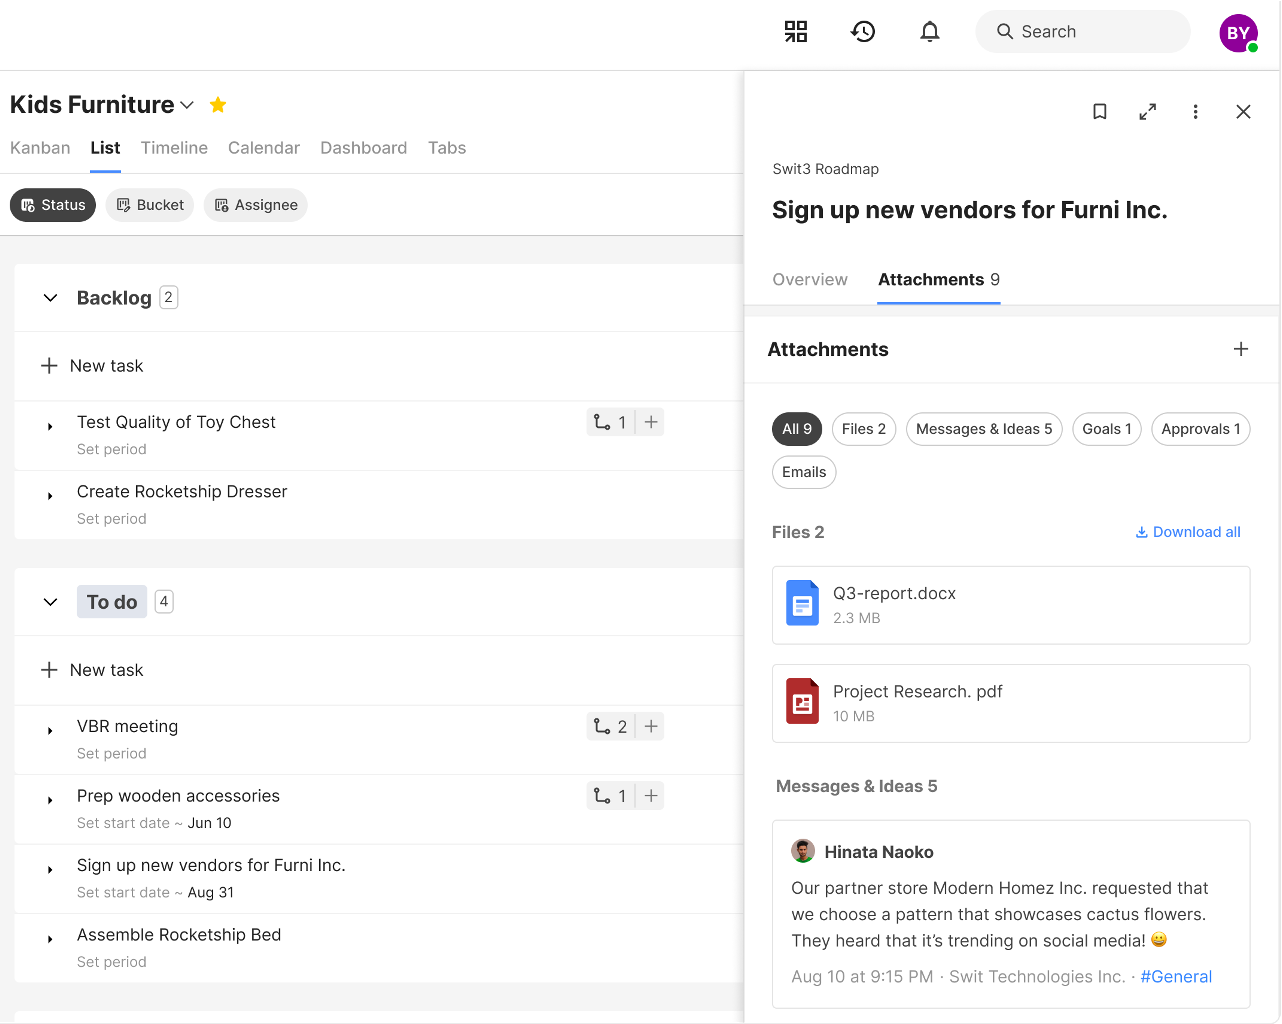
- Enter the Attachments tab on the task details page.
- Click on the right and upload files or directly fetch files from linked third-party apps. You can also copy the links of messages or ideas and add them as attachments.
Save a task
Tasks that need to be checked again later can be archived, and if necessary, they can be viewed from Saved. Click on  at the top of the task you want to save the task right away.
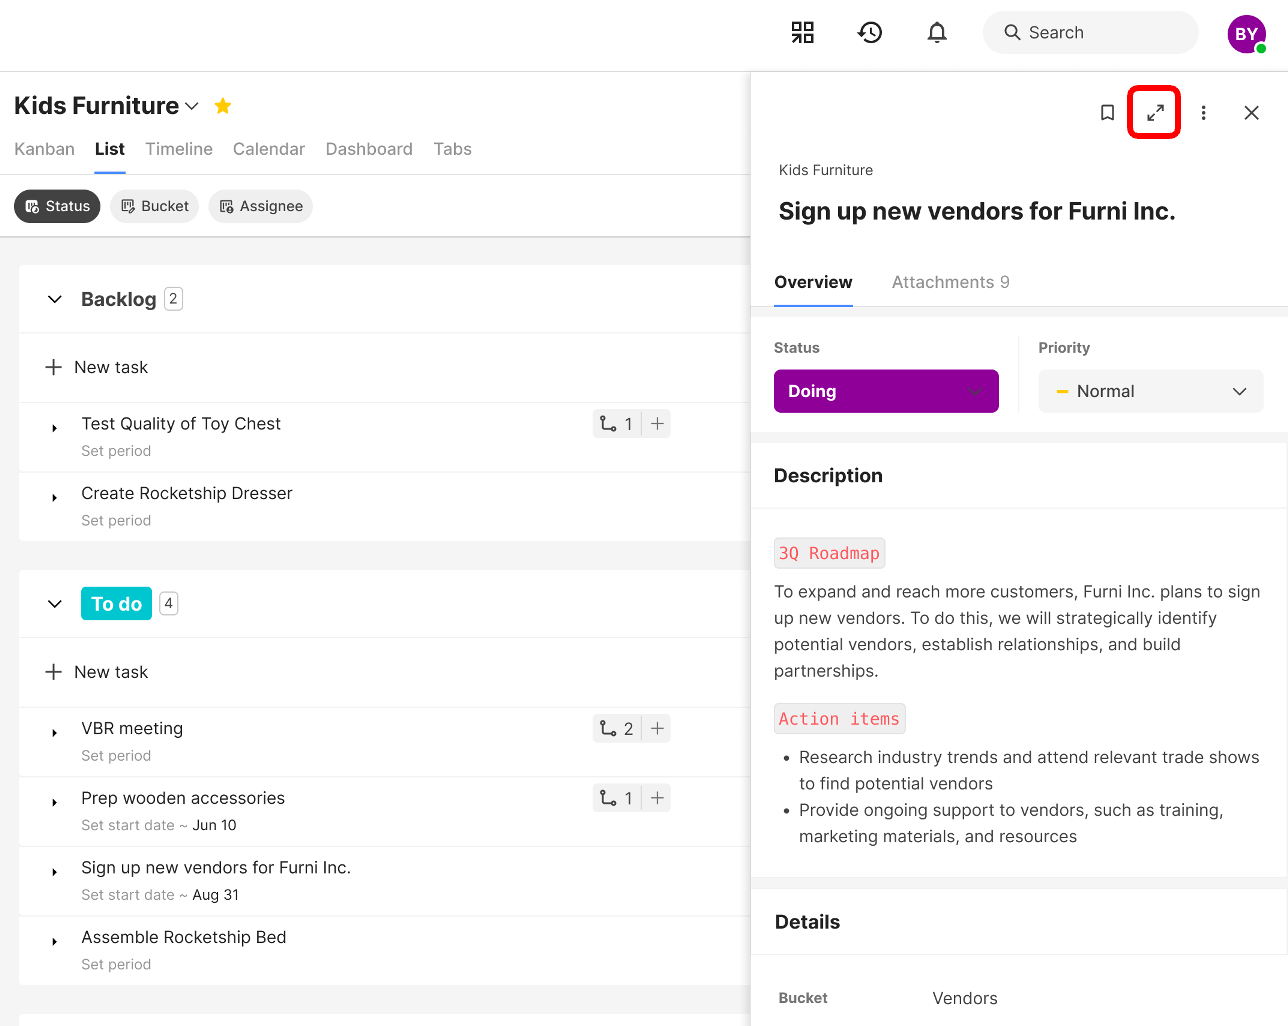
Adjust the task screen size
A task is opened in the right panel.
-
Click on
 to expand the task screen size. In the expanded task view, you can focus better on the task, and in the reduced task view, you can keep track of what's happening in other areas of your collaboration space in real-time, maximizing usability. Furthermore, while a task view open in the right panel, more cross-functional actions become possible.
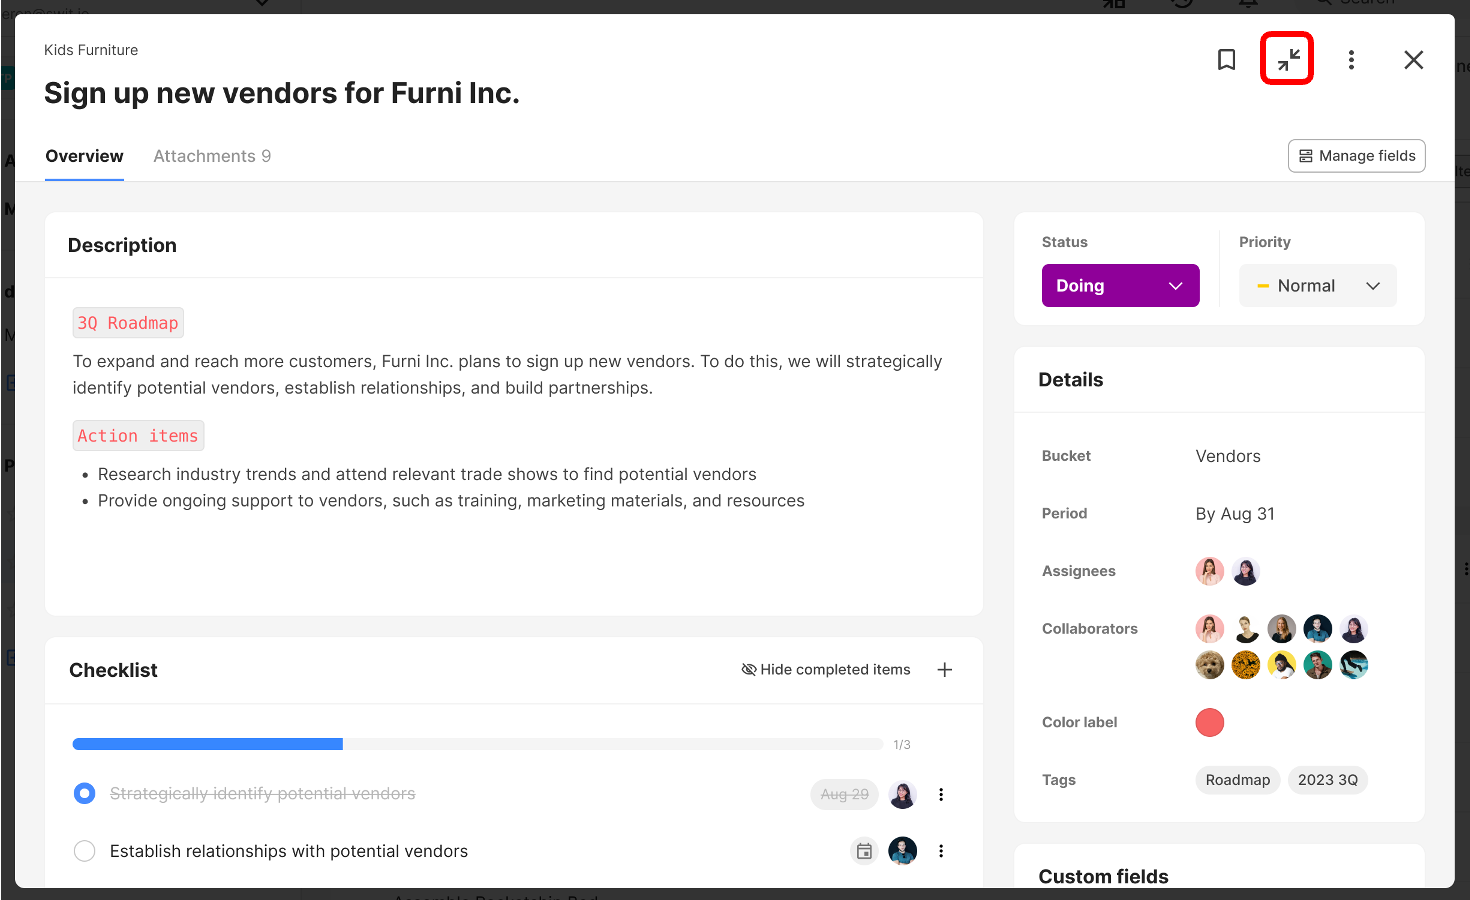
-
Click on
 to see a smaller task screen in the right panel.
Copy a task URL
Using this feature, you can easily move to the task from other pages. You can copy the URL of a task and paste it in various locations. To copy a task’s URL, click on  at the top right of the task details page, then select
  Copy task URL.
TIP
The copied task is only accessible from the web browser and cannot be opened within the app.
Duplicate a task
When similar types of projects and tasks are repeated, you can duplicate a task and create similar tasks. You can duplicate a task as follows:
-
Click on
at the top right of the task page, and click Duplicate. -
After selecting the project and bucket, rename the task title, and choose the items you wish to keep in the duplicate options. If you choose to keep the assignee or participants, they will automatically be invited to the target project.
TIP
When duplicating a task, it will be copied in the format with (Copy 1) added after the original name, and the project and bucket names can be changed by the host at any time.
Share a task to a channel or chat
Click on , select  Share, and select Share to channel or Share to chat. All members within the selected channel or chat will be able to view the shared item.
What is a subtask?
Subtasks help you organize your workflow better by breaking down large-scale projects into smaller, more easily manageable units. While subtasks function somewhat similarly to checklists, each subtask can be an independent task, facilitating a more systematic workflow. Subtasks help you understand the task details and make the communication process more transparent.
Add a new subtask
There are two ways to add a new subtask.
- Add a subtask in the project page: In the project main page, click the + button next to the subtask icon and type in the subtask title.
- Add a subtask in the task details page: Click on to add a subtask at the Subtasks section located in the main column of the task details page.
Convert a task to a subtask
In addition to adding new subtasks to a task, you can make an existing task into a subtask of another task.
Convert a subtask to a main task
You can also make a subtask into a task as follows:
- Click on the right side of the subtask you want to convert to a main task, and select Convert to main task.
- After it is converted to a main task, choose the project and bucket the task will belong to, and click Convert. Note that attached files and comments will not be retained.
Move a subtask into another task
You can move a subtask added to a task into a subtask of another task. You can move a subtask into another task as follows:
- Click on at the right of the subtask you want to move, and select Move.
- Choose the project and task you want to move the subtask to, then check the items you want to keep. If you choose to keep the assignee or participants, they will be automatically invited to the target project.
NOTE
A task can have up to 7 levels of subtasks. If the task you are trying to move already has all levels of subtasks, it may not appear in the search.
Duplicate a subtask
If a subtask of another task needs to be included under another task as well, you can conveniently duplicate the subtask just like regular tasks. Even if it's not a task within the same project, you can duplicate the subtask to any task within any project you're participating in. You can duplicate a subtask as follows:
- Click on next to the subtask you want to duplicate, and select Duplicate.
- Choose the project and task you want to duplicate to, then select the items you wish to keep.