Templates, custom fields, filters
Templates
-
For tasks that occur repeatedly on a regular basis, you can create recurring tasks. The tasks that recur can be managed with templates. When creating templates, you can set all options other than the repeat options like you would in non-recurring tasks.
-
A template concerns each recurring task. If you want to create tasks that repeat regularly, make a template and set the recurring schedule.
-
Click on Templates at the top right of the project main page to create a new template, view the list of templates, and manage templates.
TIP
Task templates are configured with overview and attachments tabs just like a regular task. See [Task overview] for details.
Manage templates
-
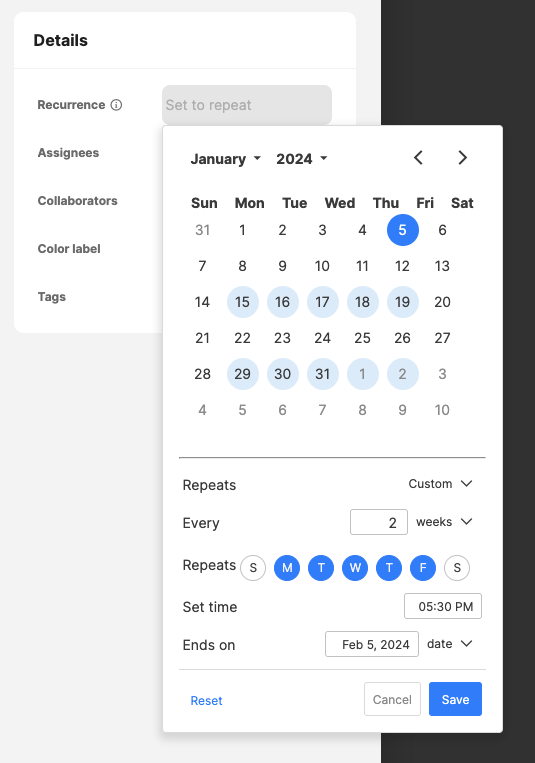
Set repeat cycle: You can set the template to No repeat or Daily, Weekly, Monthly, or Annually . Alternatively, you can choose Custom to customize the repeat settings. If you toggle on the Exclude weekends option, all weekends will be excluded regardless of the repeat setting.
-
Set repeat time: You can set the exact time, in 15-minute intervals, when you want the recurring task to be created.
-
End the recurrence: You can end the recurrence by either setting the number of times the task will repeat before it stops recurring, or the specific date that the recurrence will end.
-
Set the status of recurrence: You can set the status of the task at recurrence. Both default and custom statuses can be set for the templates.
TIP
- Clicking on Reset will delete all settings.
- Settings for checklist, related tasks, assignees & collaborators, tags, color labels, etc., are also replicated when a task is created from a template.
Project custom fields
In addition to the fields provided in the task details page by default, custom fields can be added to meet various needs. Custom fields can cater to the users' needs by providing requirements or elements of tasks that may not have been included in the default fields. The custom fields created can be used within the workplace, and you can use the same custom fields in different projects.
Custom field settings
Click the Field settings button at the top right of the project main screen to open the field settings window. Here, you can add fields in addition to the default fields for better management of your tasks. Custom fields can fulfill additional needs not covered by the default fields. The created fields can be used anywhere in the workspace, and the same project field can be used across multiple projects.
Main column and right column
Custom fields can be added to the main column or the right column. The columns define the location in the task details page. Numbers, dates, names, URLs, and other various types of fields can be added to the projects, and the added fields are applied to the project as a whole, not limited to individual tasks.
- Main column: The main column is located at the left of the task details page, and this is where the key elements of a task such as the task title, description, checklist, and attachments are found. Texts, links, and checklists* can be added as custom fields in the main column.
- Right column: The right column is located on the right side of the task details page, and here you can see the task's status, priority, period, assignees and collaborators that help specify the details of the task with more specific settings. Texts, links, dates, members, numbers (currencies), multi-select options, and select options* can be added as custom fields to the right column.
Add a new custom field
In the Field settings window, clicking the + New field button at the bottom left allows you to add a new field. When adding a new custom field, ensure that the desired column position is set correctly.
NOTE
Once saved, the field will be displayed in the task details screen of the respective workspace, and it cannot be edited afterward.
Browse and import custom fields
When browsing custom fields, all fields created in public projects within the workspace you're participating in will be displayed. To browse existing custom fields, select the Browse fields tab in Fields setting. To import existing custom fields to a project, choose a field, and click Import to this project.
Filter by custom fields
In All tasks, you can filter the tasks by fields to see which tasks are using particular fields.
Delete a custom field
To delete a custom field, go to Field settings, click on ( ) to the right of the custom field you want to delete, then click the delete button.
Custom field management permission
Custom fields are generally managed by the project host. When the host gives the permission to add and delete fields to all members, everyone participating in the project can add or delete custom fields.
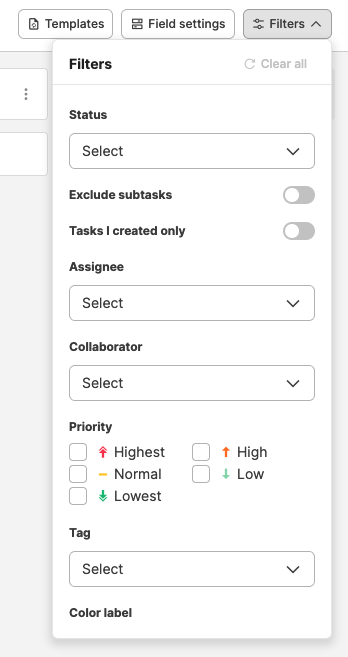
Project filters
You can use various elements that make up a task, such as task status, priority, task assignees and collaborators, due date, tags, and color labels, as filters to only display the desired tasks in the list. By excluding subtasks or to only view tasks created by the user themselves, it can be handy when you want to see an overview of major tasks or only your tasks.
NOTE
When filtering by status, you have to click on the search window to see the default statuses (To Do, Doing, Done).
