Organization and workspace
Organization and workspace
-
Organization: An organization can encompass one or more workspaces. Within a single organization, different departments or teams can have their own distinct workspaces, or all collaborate in a single workspace. Swit also offers cross-workspace support, facilitating collaboration across these workspaces.
-
Workspace: An online space where organizational members gather to communicate and collaborate. With integrations supported for various external services such as Google Workspace, GitHub, GitLab, and Zapier, Swit users can focus on their tasks without leaving the workspace. A workspace contains channels for communication and projects for specific task management.
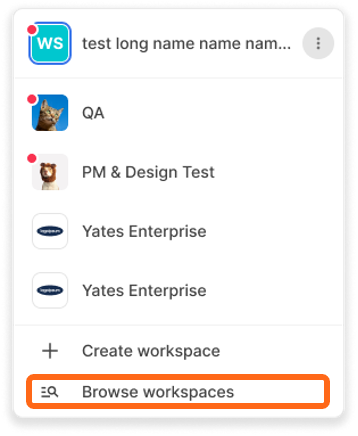
Browse and join workspaces
-
Browse workspaces: When you click on the name of the workspace at the top of the main menu to open a dropdown menu, you can Browse workspaces, You'll see the list of public workspaces you are not currently participating in. For each workspace, you can check the number of public channels and projects, as well as the number of members within them.
-
Join a workspace: In the Browse Workspaces window, when you click Join on the right side of the workspace you want to participate in, you will immediately become a member. You can also join a workspace by being invited by a workspace member. To join a private workspace, you must be invited by a member of the workspace.
Create a workspace
You can create a workspace if you need a new collaborative working space for your team. To create a new workspace:
-
Click Create new workspace.
-
Type in a workspace name, choose whether to make it public or private, then click Continue.
-
You can import data from Slack, Trello, or Asana to your workspace. You can also skip this step.
Workspace administrators
-
Independent of the organization, there are workspace masters and admins who create and manage workspaces. For a detailed understanding of the permissions of workspace masters and admins, see here.
-
Workspace admins modify workspace info, change permission and auto-join settings, and invite or manage members in the Workspace settings. They can also export or import data, and if the workspace is no longer in use, delete the workspace.
NOTE
- If the workspace master account is inaccessible, it is advisable for the organization master to remove the workspace’s master account from the organization. Subsequently, a new workspace master will be appointed based on the sequence of members joining.
- If the workspace master had previously assigned workspace admins, the earliest appointed admin will become the new workspace master. The workspace master can also transfer their master role to any workspace admin of their choosing.

Manage workspace info
In Workspace > Workspace settings, you can change the workspace name and image and decide whether to set it as a public workspace. All members of the organization can join a public workspace through workspace browsing, but you need an invitation to join a private workspace.
Permissions
You can set the following permissions in the workspace:
- Invite members: You can set the permission to invite members to the workspace.
- Manage channels: You can manage who can create, archive, or delete channels or manage channel members in the workspace.
- Manage projects: You can manage who can create, archive, or delete projects or manage project members in the workspace.
Auto-join
When a new member joins the workspace, you can specify channels and projects to which they will be automatically invited. You can choose up to 10 channels and projects each, and once set for auto-join channels or projects, they cannot become private, archived, or deleted.
Workspace members
Click on the  icon on the right side of the workspace section in the main menu to view all members, teams, and groups belonging to the workspace. Or click the "More" button on the right side of the workspace (
 ) and then click View members button.
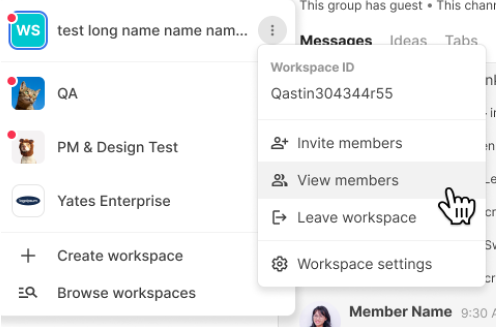
You can click Invite at the bottom right of the member list to invite new members to the workspace. At the bottom right of the member list and the team list, there's also a Chat button. Click this button to start a 1:1 chat with a desired member or a group chat with a desired team.
Invite members to a workspace
You can invite members or teams of the organization to the workspace. There is way to invite new members to the workspace:
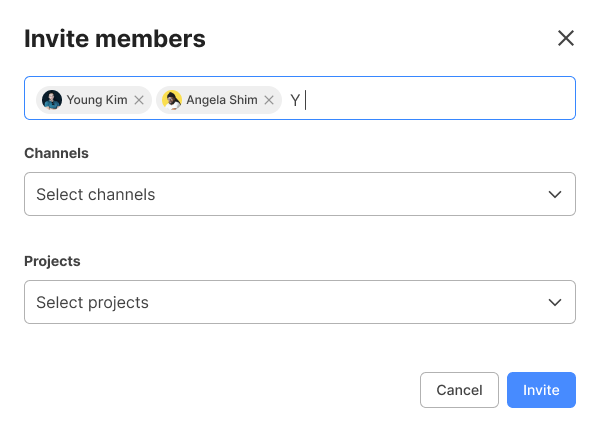
- Click on ()the right of the workspace you want to invite new members from the workspace list.
- Click on the Workspace settings menu.
- Click on the Members tab, and then click Invite.
- Search for the member or team to invite. If you select channels and projects in the workspace, they will automatically join those channels and projects upon invitation.
TIP
When inviting members, if you select a team, you can invite the entire team to the workspace at once.
Export or import data
NOTE
This feature is accessible to only the workspace master and admins.
Workspace data can be exported for backup and analysis purposes. However, it is important to note that exporting and storing these data without a valid and justifiable reason can be potentially harmful, and in the event of a data leak, the user of these data will bear full responsibility. Therefore, it's crucial to thoroughly review all security aspects before proceeding with the use of exported data.
-
Export data: You can download workspace files, data, etc., for a specified period as a JSON file.
-
Data included: Messages and ideas from public channels, tasks from public projects.
-
Data not included: Chat messages, messages and ideas from private channels, tasks from private projects, and edit and delete history.
TIP
The timezone for which data will be collected is UTC±00:00. Set the date range considering your time zone. The exported data will be saved as JSON files.
-
-
Import data: You can transfer and map the data you used in Slack, Trello, and Asana to the respective workspace channels and projects. Set up custom mappings for each channel and project and easily bring the information into the workspace. To align all the information perfectly, make sure to have the same members join this workspace in advance.
Delete a workspace
Workspace masters can permanently delete a workspace no longer in use. When a workspace is deleted, all workspace data, including posts and files will be permanently deleted. Please be careful as this action is irreversible. To delete a workspace:
- Click on o the right of the workspace you want to delete.
- In the Workspace settings window, click on the Delete workspace tab.
- Click Delete workspace and enter the current password.
NOTE
If you signed up with a third-party account and don't have a password for your Swit account, you must create a password before deleting the workspace.
Organize your workspace list
You can set the order of the workspaces you're participating in as you wish. Click on the workspace whose order you want to change and drag and drop it to the desired location.
Leave a workspace
You can leave a workspace you no longer need to participate in at any time. However, once you leave, you will lose all access to the information of the workspace. To leave a workspace, click on the icon, then click Leave workspace.
TIP
You can rejoin public workspaces any time through Browse workspaces.
Analytics
This is where you can check the trend of changes in the overall workspace setting, channels, projects, number of members, date of creation, type, and others. You can move to the Analytics page by clicking Analytics via the Workspace dropdown menu.
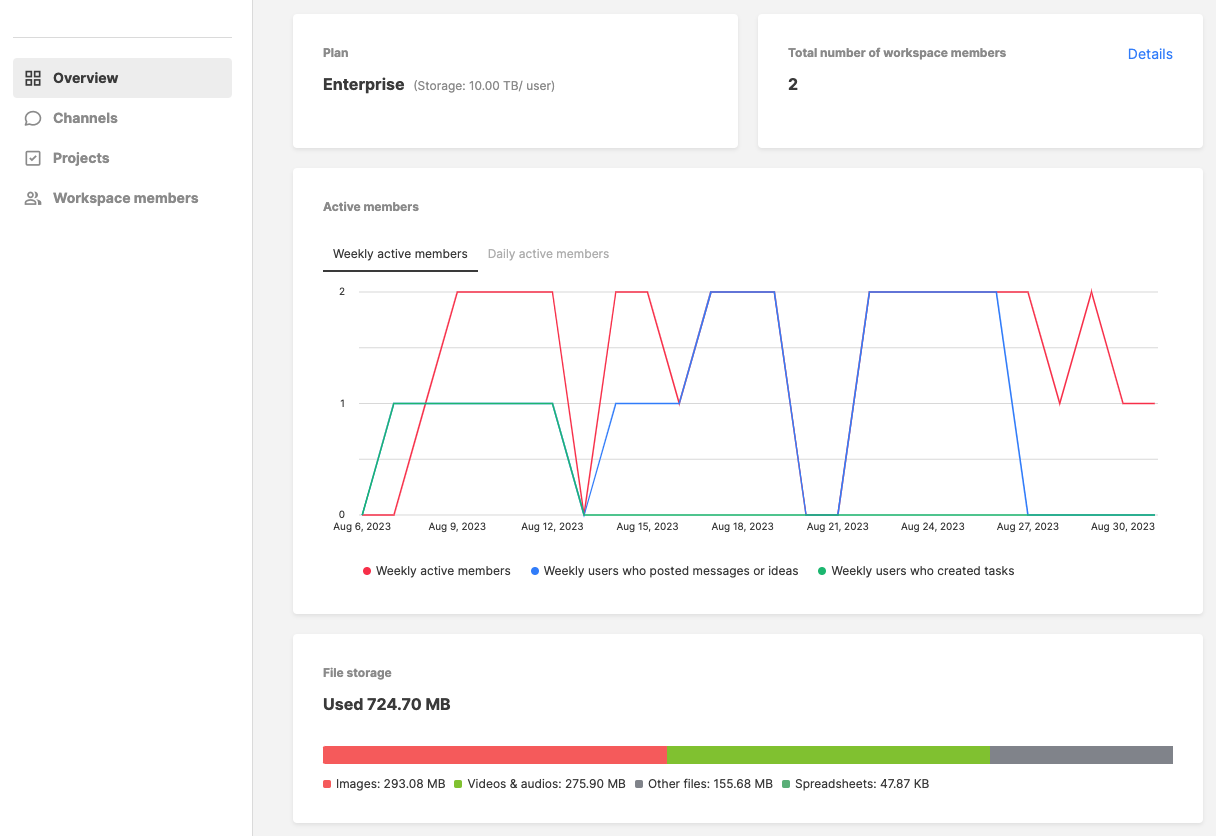
The Analytics page consists of the following tabs:
- Overview: Shows the pricing plan, the total number of workspace members, the number of active users, and the file storage capacity, channels, projects, messages, ideas, and tasks by a specific date or time period in a graph.
- Channels: Shows the number of channels created and each channel’s name, date created, type, last active date, and numbers of messages, ideas and comments created.
- Projects: Shows the number of projects created in the workspace and each project’s name, date created, type, members added, tasks created, and comments and items created.
- Workspace members: Shows the number of all members in the workspace, email, role, dates joined, and days active of each member, messages, ideas, and tasks each member created and marked done.
NOTE
Only the workspace master and admins have access to Analytics.
Group
In various situations, such as for project teams or task forces, a subset of workspace members needs to collaborate as a group. Workspace admins can add a group in Workspace members > Groups > +Create group. You can also edit the group information or add members to the group. The groups can be utilized as follows:
TIP
When typing in texts in channels, direct message channels, and projects, you can use @mentions to refer to a group. If you mention a group, all members belonging to the group will receive notifications.
Keyboard shortcuts
Use Keyboard shortcuts for easier access to major features when you move, search, conduct tasks or chat. Type in the following keys for each OS or click on Help on the top bar to see the list of all shortcuts.
- Windows:
Ctrl+/ - macOS:
Command+/
Quick find
It enables you to quickly move to the page you want including workspaces, channels, direct message channels, and projects by simply typing in the name of the destination. Type in the following keys for each OS to open the Quick find window.
- Windows:
Ctrl+K - macOS:
Command+K